PENWISE FOR ANDROID GUIDE
How to take notes with S Pen in Penwise for Android
Turn a blank page into notes with an illustration, handwritten labels and highlighted ideas. Start with six practical steps in the Penwise handwriting editor.
Before you start
You will need a Samsung tablet compatible with S Pen and Penwise for Android installed. Open an existing notebook or create a fresh one to practise. The steps below work with notes on your device; connecting Google Drive is a separate step if you want to sync.
The Penwise toolbar can be customized. If an icon is in a different position on your tablet, use the tool names in this guide to find it.
STEP 01
Create a notebook for your lesson
In the library, choose New → Notebook. Enter a Notebook name, choose a cover and open Paper & size to pick the page background. Select Create notebook to open the writing page.
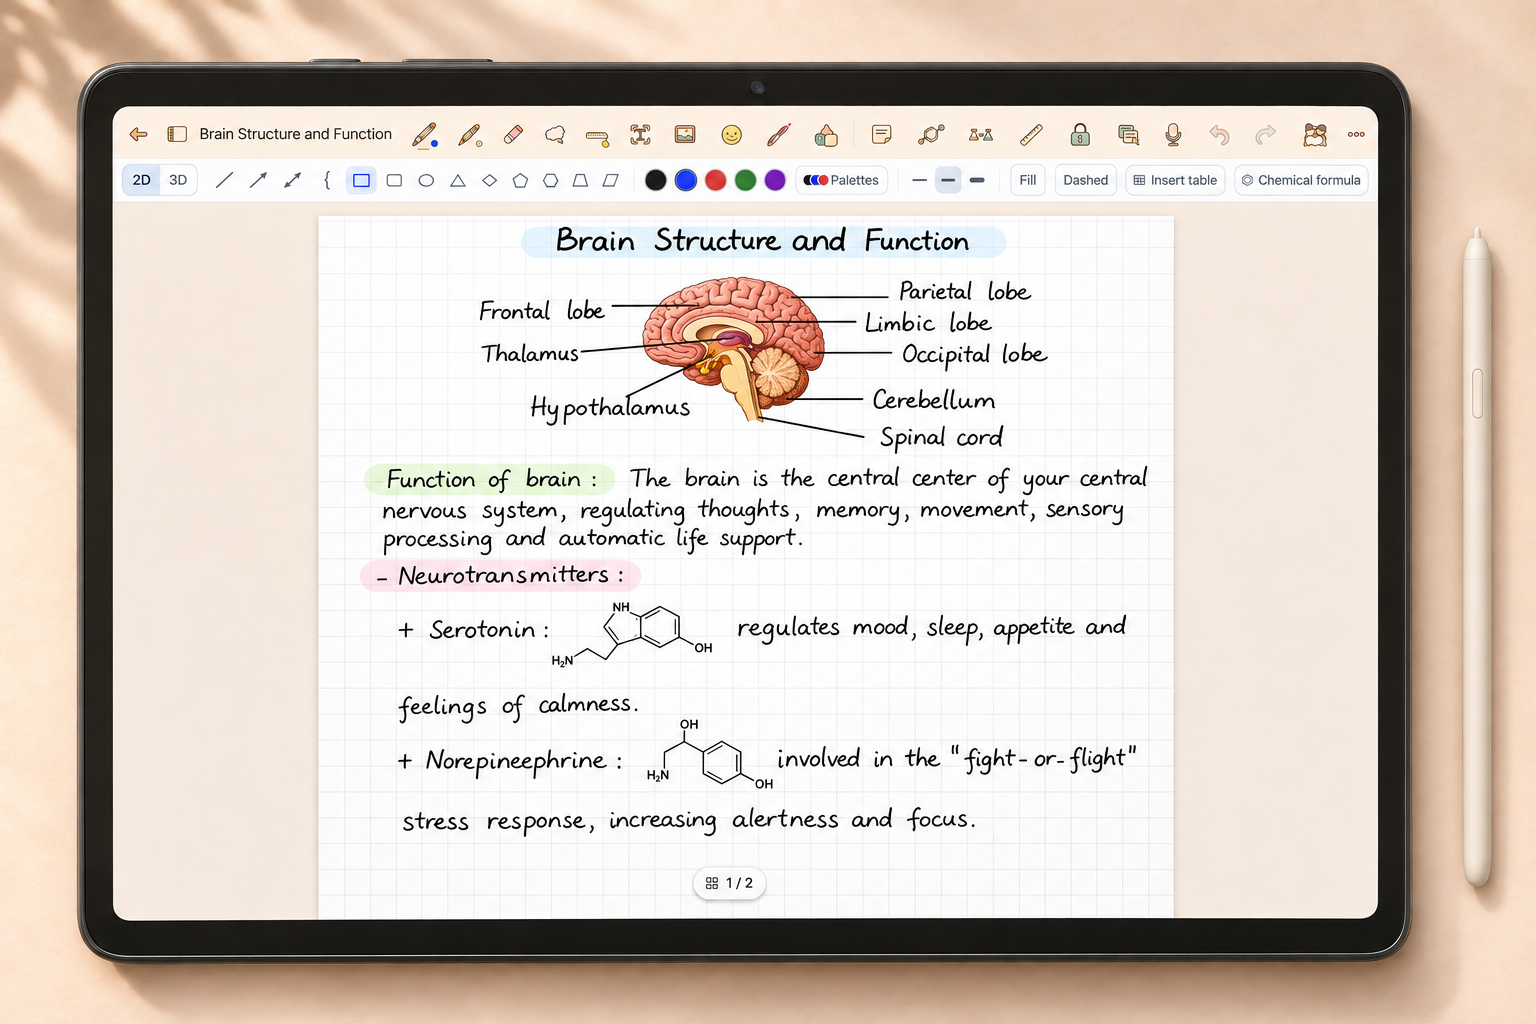
For an illustrated lesson such as “Brain Structure and Function”, grid paper can help align labels and short paragraphs. Lined paper works well for pages that are mostly handwriting. These are layout suggestions; choose the paper that suits the way you take notes.
STEP 02
Choose a pen, color and stroke width
Tap Pen in the toolbar. Tap the selected pen again, or tap the pen type in the options row, to open the pen panel.
Penwise includes Fountain pen, Ballpoint, Brush pen, Calligraphy and Pencil. Fountain pen varies the stroke with pressure; Ballpoint is a useful starting point for more even, quick handwriting. Choose a color and stroke size in the row below the main toolbar.
Use the writing preview in the pen panel to adjust Pressure sensitivity, Stroke stabilization and thickness. Try a few short lines, small letters and a heading. Change one setting at a time so you can feel the difference.
STEP 03
Write with S Pen and navigate with your fingers
In the pen panel, find SETTINGS and turn off Draw with finger if you want to write with S Pen. With this option off, one finger can scroll the page; use two fingers to move around and zoom in or out.
Find Hold the S Pen button while writing to use temporarily. Choose Eraser, Lasso, Highlighter or Do nothing. With Eraser selected, hold the side button while moving the pen tip over a stroke to erase it. Release the button to return to your selected tool.
STEP 04
Write a heading and highlight key ideas
Write a short heading in a dark color and leave space between groups of ideas. In “Brain Structure and Function”, the illustration and its labels sit at the top, with the function notes and smaller sections below.
Select Highlighter, choose a color and stroke size, then draw across a heading or phrase. Select Pen again to continue writing. One highlight color for headings and another for supporting ideas can make the page easier to review.
To add your own illustration, choose Insert image in the toolbar and select an image from your device. Leave room around it for handwritten labels instead of crowding text against the picture.
STEP 05
Rearrange notes and correct strokes
Choose Lasso, draw around the content you want to move and drag the selection to its new position. For example, move a label away from an illustration to make its annotation easier to read. If the selection includes too much or too little, deselect it and draw around the content again.
Use Eraser to correct a stroke, or the toolbar’s Undo and Redo buttons. The pen panel also has Tap with 2 fingers to undo, 3 to redo; these gestures work when that option is enabled.
Zoom in for small labels, then zoom out to review the whole layout. Keep space between the title, image and paragraphs so the page remains readable at its normal size.
STEP 06
Return to the library and review your notes
Penwise automatically saves notebook changes on your device. When you finish writing, use the back arrow to return to the library, then reopen the notebook to continue or review your work.
Saving on your device and syncing are separate. To keep a copy on Google Drive, connect it and use the app’s sync feature. Finishing a handwritten note does not by itself confirm that the Drive copy has been updated.
Make a page of your own
- Write a heading and three main ideas.
- Insert an illustration and add two handwritten labels.
- Highlight one important phrase.
- Use Lasso to rearrange a paragraph.
- Return to the library and reopen the notebook.
If something works differently than expected
Your finger still draws on the page?
Open the pen panel and check that Draw with finger is off. Select Pen while practising basic handwriting; some other tools handle touch input differently.
Holding the S Pen button does not erase?
Check that Hold the S Pen button while writing to use temporarily is set to Eraser. If Lasso, Highlighter or Do nothing is selected, the button follows that setting.
The stroke feels too thick or hard to control?
Try a smaller stroke size, switch to Ballpoint or adjust Pressure sensitivity in the writing preview. Change one setting at a time to find a comfortable result.
A page of notes, in your own style.
Start with a pen and one highlight color. Once you feel comfortable, add images and use Lasso to organize the ideas you want to remember.
Explore Penwise